Hello there! I've been asked a handful of times how I skin, my tips, techniques, and whatever else in regards to my skinning. I've decided to sit down and compile my style into a guide, to aid those who'd like to know more. If you are going to be following this guide, I beg of you - take elements, but not the entire style. One of the major reasons my skinning is the way it is because I've added my own flair and twists.
Here's a link to another tutorial on how to use MCSkin3D by Goldifish.
Some FQAs regarding my skins:
Q: What program do you use? A: MCSkin3d - it's a program developed by paril from planetminecraft, but has since been absorbed into the actual site, so it doesn't receive any updates. It's a fairly easy to learn program, and I taught myself in only a couple of hours. There's a 3D mode, 2D mode, and a hybrid where you're able to see both.
Q: How long does it take you to make a skin? A: In actuality, skinning doesn't take me too long. A full skin that I expend a LOT of effort into can take me anywhere from 2-4 hours purely of time spent skinning. The reason my skins take so long to be delivered, however, is motivation - I often find myself lacking any real will to skin, and as such, they sit half completed in my saves.
Q: Will you make me a skin? A: If you pay me and it's a good concept, I'm sure something can be worked out :-D
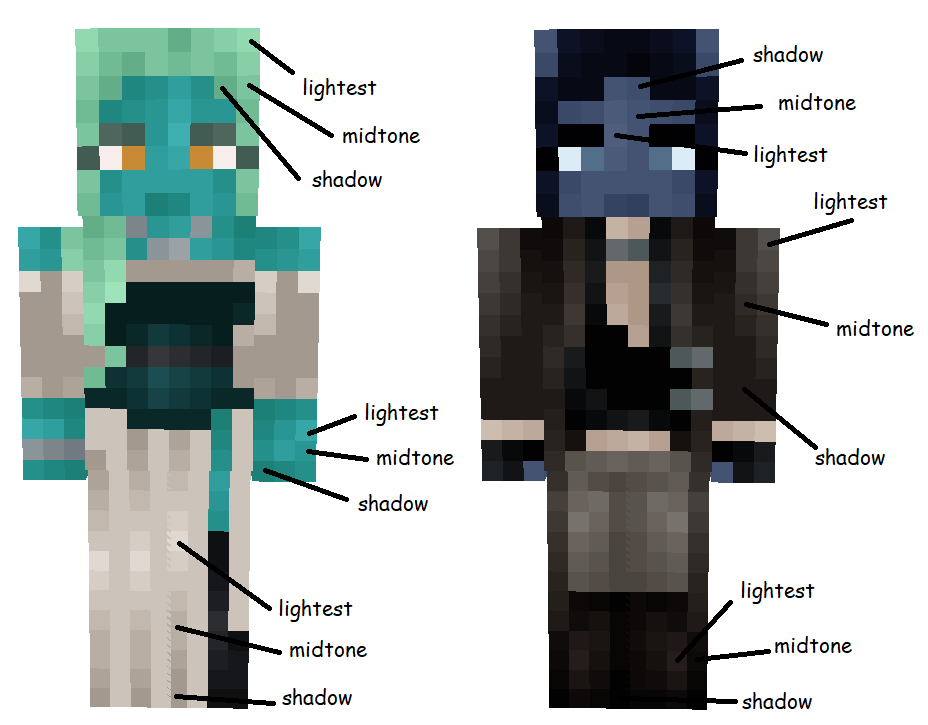
Finding Shadows And Highlights
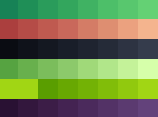
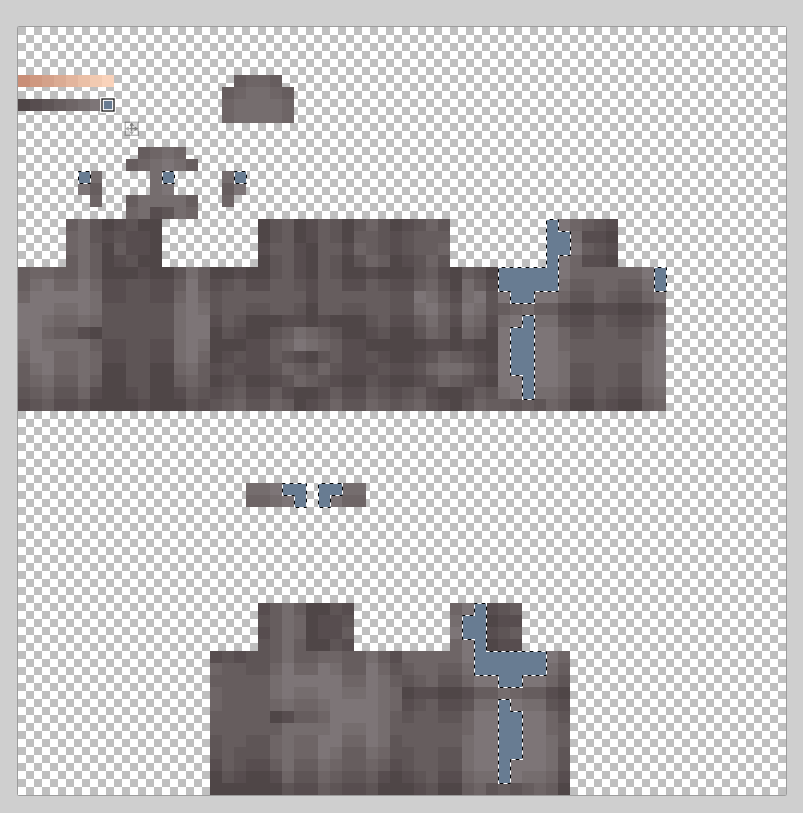
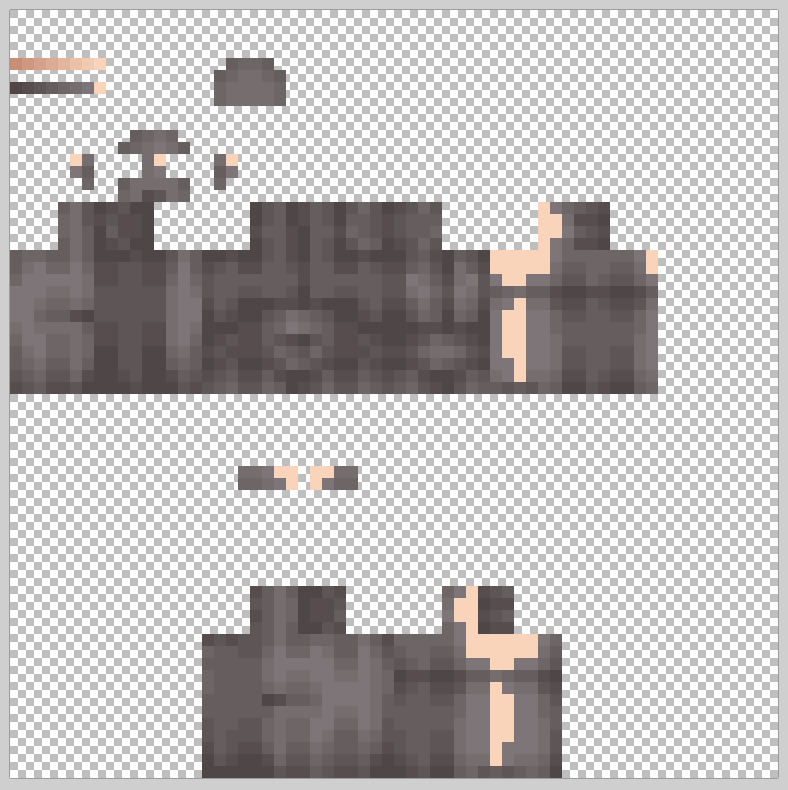
Here is a skin I've made previously, outfitted with highlights and shadows. The light blue is where I typically try to keep the shadows, and the light green is where I try to put the highlights. It'll differ on every skin, mainly because of the layout of clothing. For female skins, I do my best to put shadows below and above the waistline, beneath the bosom, below the puff of sleeves, and below the chin. For highlights, I do my best to put them atop the bosom, on the outermost part of the sleeves, and the middle of the dress. For male skins there isn't as much of a science, merely wherever it makes sense to have a darker part and a lighter part. I tend to put shadows where the arms meet the body and around the waist.
Choosing Good Colours
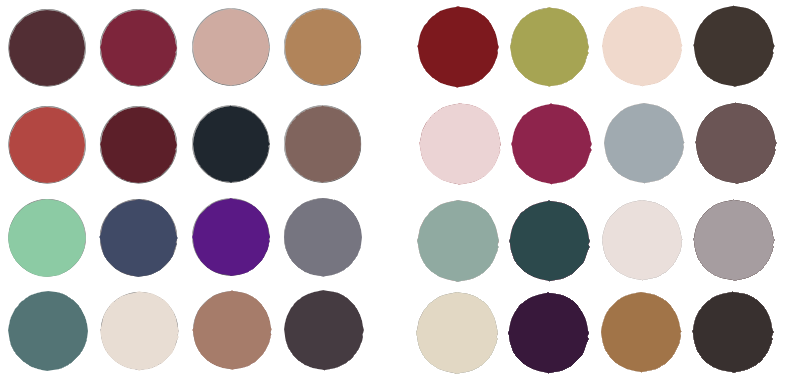
I'll shamelessly admit that I have a very difficult time choosing colours. Most of the time, I colour pick them directly from a reference I'm using - unless there's others someone wants me to use. When I'm forced to pick my own colours, however, I try to keep a good balance between saturated and light. I do my best to pick a colour in the midrange, dark/lightness wise, unless it's supposed to be a darker colour. Here's an example of where I typically pick colours.
Whenever I start a skin, I typically ask for descriptions, or find a reference. Working off your imagination can be tough, if you have no inspiration. Even just having something to take components from helps quite a bit. For the sake of this thread, I've chosen this reference here. I'll be going step by step, on how I typically make a skin from scratch.
Step One - Base Colours and Shapes.
This part is fairly easy, in comparison to everything else. All you really need to do is examine whatever reference or inspiration you have, and start slapping down some shapes and colours. Here's my blank skin.
I typically start putting the colours and shapes down only on the front, to save some effort and get a feel for the shape and look of the actual skin.
As you might've noticed, the colours and shapes don't match up exactly with the reference. Typically, it's hard to translate anything perfectly to a minecraft skin - and you'll have to make adjustments accordingly.
Step Two - Hat Layer.
Hat layer is incredibly important. Don't let anyone tell you otherwise. Without it, you skins would be flat, boring, and square. This adds a 3D touch without a ton of added work. For the sake of showing where I'm putting the hat layer, I'll do it in obnoxious colours.
Though it looks pretty silly with the bright colours, the hat layer helps to beef up the base skin, and create some depth and dimension. The blue on the shoulders adds a padded/raised look, while the chest and waist area helps to define some curves. The red amps up the sleeves and the sash at the waist, while the purple gives some shape to the boots and gauntlets. The green adds some to the gold, but notice how there isn't too much of it. Here's the same skin, but with the hat layer colours corrected.
Without shading and moving the model around, there isn't much difference. But the shape is there, which is a great start.
Step Three - Shading.
Shading may be the most difficult step. Or - at least - it is for me. The different values and where to put each of them often trips me up. The key things to remember when you're attempting to shade is the weight of your values, and the shadows and highlights of the body/clothing/armor pieces it's wearing.
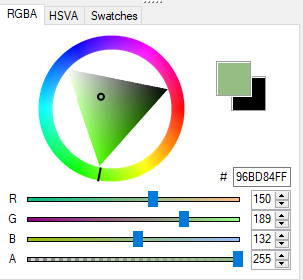
If you're using MCSkin3D, it's a bit easier to understand how I get the values of all my shades. When shading anything, I typically use the second tab of values - HSVA.
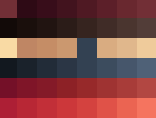
When shading cloth, I use less intense shading, as opposed to armour, where the contrast between shades is higher. Here's the shade for the blue I'm using in the skin.
The reference shows a bit of a more blue-ish green than a green-ish blue, so I'll be going up on the H value. Typically, this doesn't move much, only about 2-3 per shade.
If I'm looking for a darker value, I'll adjust the S up 4-6, and the V down 5-7. I don't touch the A, as that's opacity, and I'd like to use a full amount of pixel instead of a partially transparent one. For lighter, I'll go the opposite direction on all of them, besides the A. Basically, I aim to make my darker shades more colorful and saturated than the lighter, which are more pastel and de-saturated.
For the shading of the skin, I'll be going shade by shade, just so it's easier to see how I make the shapes and follow the shadows/highlights.
For the sake of saving space, I'll go ahead and do the rest of the pieces without taking pictures.
I left the gold untouched, because metals are something special. I'll do them last, to show the process of that. Next comes shading the hat layer. Instead of simply copying whatever shading was beneath, I typically go lighter and brighter for the hat layer, to show off the depth and 3D effect. I simply take the base shade, and go lighter and lighter, like shading backwards.
Here we are. When shading, instead of putting the highlights around the middle, I put the lightest colour at the top - and let gravity do the rest of the work. I.E. putting the lightest colour at the top, then the middle colour in the middle, and the darkest colours on the bottom.
Step Three ½ - Shading Metals.
Gold and silver are tough to present well, and not just as a yellow or grey. When shading these, I typically go from yellow to red, and from grey to blue. This helps give it a 'shine', and make it more realistic. Here are some values I typically use for gold and silver.
To achieve this, just do a bigger jump on the values in the H slider/value thing.
There we go, outfit shaded!
Hopefully that helped somewhat on making and designing skins! If there's any interest, I may add on how I make/shade heads, but for now I think this'll suffice. Happy skinning!
I thought this would help me skin the 30-50 feral hogs in my backyard, but it didn't which I'm a bit disappointed in. I'm joking dont kill me pls
I actually needed to see this since I've been trying to do some more skinning on my own and it's a very comprehensive guide, thank you for making this!
It's been more than six months since I posted my last skin guide, and my style and techniques have definitely changed, since then. I thought it best to post a new tutorial for anyone interested in furthering their talent or learning how to skin. I am by no means the best skinner in the world, but I might have some tips or tricks that help!
Here's a link to another tutorial on how to use MCSkin3D by Goldifish.
A : MCSkin3D! I've linked a tutorial Goldifish made for the program above. It's unable to be used by mac users, so for that, I apologize. When I worked on a mac, I'd use a combination of programs - PMCSkin3D, the skindex, minersneedcoolshoes, and gimp. All of these have their useful qualities, but MCSkin3D is by far better and includes much of why I liked all of these programs.
Q : How long does it take you to make a skin?
A : Around 1-2 hours. I've managed to streamline the process, and really only spend a lot of time on a skin if I'm stuck with the design. Practicing a LOT has helped me cut down on how long it takes me to make a skin, so don't be discouraged if it takes you much longer.
Q : Do you take commissions? How much do you charge for skins?
A : Yes and no. I'm pretty fickle when it comes to work for people I don't know, so actual 'commissions' open to everyone are sparse. I host auctions with custom slots here and there, whenever I'm in need of money or bored.
I do, however, take commissions for friends and often gift them to people I roleplay with frequently. As for prices, they vary - the auctions usually go for 25$ a piece, but my normal prices are anywhere from 12-20$, depending on what you believe it's worth, and how much you're comfortable with spending. I've also hidden a coupon code somewhere on this post, for anyone to use if they're able to commission a skin from me. The first person to use it will get half off of their commission!
Each skin I do follows a set of steps. You don't have to follow them yourself, or you can rearrange them, but this is what makes sense for me. I'll go through each step more in depth below.
Step 1 - Acquire references. Step 2 - Plot base shapes. Step 3 - Add hat layer. Step 4 - Adjust the base and hat layers until you're happy. Step 5 - Ensure your colours are correct. Step 6 - Make a palette for each colour. Step 7 - Begin shading each part. Step 8 - Adjust shading, base and hat layers until you're happy. Step 9 - Colour correct if you aren't satisfied. Step 10 - Give it a final glance over, then you're finished!
While this may seem like a lot of steps, or seem like some of them are redundant, it helps me to ensure I'm not missing a piece of the skin. A lot of the time I'll backtrack between the steps if I'm not happy with an area.
References are a MUST for any of my skins. It's difficult for me to visualize parts, or the theme as a whole without something to look at. This doesn't always have to be in the form of medieval clothing, though - sometimes I'll sketch out a rough idea, find shapes or pieces of clothing I like on Pinterest, or even reference other skins I know I liked in the past. This last part helps me to ensure I maintain a signature 'style' to skinning, and keep my pieces recognizable.
The best place to find references, in my personal opinion, is Pinterest. It's easy to keep a board and accumulate clothing and art whenever you see something on your home page for later use. Some other skinners on the server keep public reference boards, so poke around and ask some questions if you're struggling to find something.
A good reference can also be tricky. Ideally, you'd like something that translates well to a minecraft skin, and isn't too simple or too complicated. Some aspects of a reference just won't be able to be conveyed on a minecraft skin, and that's alright! Simply adapt it to keep the same theme or vibe, and it'll look better than if you tried to stick religiously to the reference. Creative freedom is very important in any work of art.
Base shapes are arguably the most important part of the skinning process. Plotting these down to ensure your design is cohesive and makes sense is a must. They don't have to be the final product, but it's like a sketch for a drawing - your rough draft, something you're able to build off of.
You don't have to use the correct colours on base shapes. If you're maybe unsure about what colours you're going to want, or you're going to make different versions, it's important to just get the shapes down first.
Here are some WIP skins I found sitting in my folders. The shapes and direction of the skin is pretty clear, even if it's just the base layer.
Hat layer is honestly a godsend. When Mojang introduced it, I was over the moon. It adds depth and shape to a minecraft skin that you just couldn't get before. COUPON CODE : HALESTORM The hat layer process follows the same as the base, really - just on the overlay instead of the actual skin itself. When I do the hat layer, I think about what shape I'm trying to convey. For softer, rounder shoulders, I won't put a pixel on the top edge of the arm. For hips, or thiddies, I'll add some pixels to convey protrusion or shape.
When doing the hat layer, select your base colour, and make it a good degree lighter. If you're using MCSkin3D, use this screen.
The HSVA relates to the hue, saturation, value, and opacity. When changing a base colour to the right shade for a hat layer, I add five, six, seven depending on the shade to the 'V' slider. Then I'll go down five, six, seven depending on the shade to the 'S' slider. It'll be lighter, and less bright than the base colour. Then you're good to go.
In the second skin, the hat layer has transparent pixels to mimic a sheer fabric. I did this by lowering the 'A' value until I was happy with it, then made a base shape on the hat layer. I then moved the 'A' value down a bit more, and went over it in a criss cross pattern to add texture.
This is fairly self explanatory, and I can't really show you how to adjust your own skin. Change it until it feels right - maybe that's shaving off a pixel on the hat layer, changing the layout of the base layer - all depends on you.
Again, I can't really show you this step. Maybe whilst doing the base you decided on a different colour, or you want a warmer or cooler shade. Go ahead and fix the base colour, then make sure to repeat the hat layer step to get a lighter version of it.
I used to absolutely HATE this step. Figuring out the different shades of my colours was the worst thing I could imagine, but recently I've come to like it. It helps a great deal to establish a palette on the actual skin itself - just not where it's visible. There's plenty of free space when you go into the 2D view on MCSkin3D that won't show up when you're wearing the skin in game.
As for figuring out palettes, you'll need to head over to the same area I showed you before.
To make a palette, take your base colour and plot it down on the transparent part of the skin. Make it a 6 or 7 long line, so you have something like this.
I'm doing both a darker colour and a lighter colour so you can see both.
Next, go down four - seven shades on the 'V' value, and go up two - seven on the 'S' value. For brighter colours, like whites, you don't want to add too much of the 'S' value, and have it show up as a bright pink or blue. Essentially, you're wanting to make the actual shade darker, but also brighter. When you have that colour, plot it on the second pixel.
Then continue this process until you've completed the whole line.
Depending on how harsh you want the transition between each shade, you can adjust the 'V' and 'S' of each one. When you've completed a line for each colour, you have your palette!
If you're wanting to go the extra mile, and make a colour that slowly transitions into another colour, change the 'H' value in either direction. This is a great way to have a blue go towards purple as it gets darker, or whatever other combination you want.
This is the same colour, just moved both ways on the 'H' scale. One towards green, the other towards purple.
It's also difficult to show you this one the way it'll be most helpful - on your own skin. Each person has their own way of shading, and that's something you need to practice and discover for yourself.
When I shade, I start with the darkest colour on my palette. I plot out where I want the darkest values / shadows to be, and go from there, up the palette. The second darkest colour around that, then the next, and the next. What I encourage you to avoid, however, is doing this for the whole piece of skin. A 'ripple' effect isn't desirable, in my own personal opinion, and I view it as a 'cop out' or a 'cheap' way of shading.
Here are two skins I've already finished. I rendered them back to their 'unshaded' state, and then compared them to shading I've done. It is always alright to reference shading other people have done, provided you don't copy everything pixel for pixel - you're free to use any of my skins as references for how to shade, how to select colours, that sort of thing.
Shading is very much a trial and error process, and I encourage you to keep re-doing it and practicing until you're satisfied. I still get unhappy with how I've shaded some pieces, so I simply go back in, change it to the base shade, and try again.
This is what I mean when I reference 'ripple' shading. You start with a colour, and just go around it like this. While, yes, it has the basics of shading - going from one value to the next - it doesn't offer anything to the skin. It doesn't take in where a light source may be, where the shadows may be, that sort of thing. I view it as a 'cheap' way to skin a skin, as though the skinner didn't put much effort into the piece or shading itself. If this is what you like to see, that's great for you - I just personally hate seeing it on otherwise good skins.
Again, not something I'm able to show you. Go through your skin and see if you're happy with how you've shaped the skin through the actual base, and then the shading. Maybe increase the light in one area, shadows in another, that sort of thing.
Now that you have a complete product, you can see whether the colours you've chosen make sense. If not, you can either re-do the entire section, or take it into a second program. Using GIMP or Photoshop, you can select a certain colour and all the shades around it, then shift the HSVA values as a whole - recolouring it without losing any of the shading. Please do this only on your own skins, and skins you have permission to edit. Taking someone else's work and recolouring it isn't acceptable.
If you've made it this far and are happy with the finished product, give yourself a pat on the back, and a thumbs up. Maybe even post that skin in a few art channels, show off your hard work. Because that's exactly what it is - hard work. Skinning, even though it's often not perceived as such, is making art. You deserve to feel proud of what you've created.
And there you have it! A skinning guide by Bunemma. I did purposefully be vague in regards to the shading for two reasons - I don't want you to just copy everything I'm doing without actually realizing the method behind it, and I want you to do it for yourself. There's no point to making an art piece if it's just a copy of something already existing.
That said, I'd love to see your finished works, or skins you've made using any of these techniques. My DMs are always open if you're wanting any advice, critique, or appreciation. Alongside that, here's a link to a skinning discord run by Jouster where you're able to post works in progress, completed skins, ask for commissions, and get feedback on your work.
Below this will be a couple more tutorials for niche things, like folds in fabric and how I do my heads. Both of these are heavily inspired by Scribbe, whose braincell I often steal. Just as a reminder, there's a hidden coupon code somewhere on this post - if you manage to find it and you're the first person to use it, you'll get half off whenever you commission me in the future.
Make a palette as directed in the post above this, and start by plotting the darkest colours on the head. I removed the horns for the tutorial to make it easier to see.
Now you can move on to the skin. I tend to do most of my skin shading the same way across skins, but figure out what works for you. Again, make a palette.
→ palettes
→ white and black are the devil's colours
→ shading
→ making shading palettes
→ shapes
→ masculine vs. feminine shapes
→ references
→ links to some boards
Hey there! Welcome to the third version of my minecraft skinning guide. It's been well over a year since my last one, so I thought I'd assemble some tips and tricks and steps to how I make my skins.
What I wanted to avoid was SPECIFIC STEP BY STEP skinning. The key to getting better at skinning, or doing any art really, is figuring out how to do it YOURSELF. If I gave you detailed instructions, you'd learn to copy, not do it in your own right.
There's nothing wrong with copying at first -- everyone starts somewhere -- but you'll plateau pretty fast. I encourage you to try these steps and make them work for YOU. Personalize them and your process.
Skinning is very much a journey that never really ends, and everyone is going on that journey at their own pace. Comparing your skin to others isn't helpful for anything - some people have been at it longer, and some people have only just begun. The only real measurement for your progress is yourself, so don't be discouraged if your skins don't look like someone else's that have been skinning for years.
I highly recommend that you push through the initial discomfort of skinning. The first one won't be great. Neither will the second, nor the third -- but when you compare them, you'll notice improvements. Skinning is trial and error, and there's a LOT of error to be had. So chin up, and keep pushing. If you're really struggling, you're welcome to reach out to me for advice, or even other skinners who I'm sure will be happy to offer some advice.
Happy skinning, and I hope this helps! You can view my other guides here and here, which might also help.
WHAT PROGRAMS TO USE : My program of choice is MCSkin3D. It's the predecessor to PMCskin3D, but it's a program of its own vs. included in a browser. There's some differences, namely that there's no mirror tool, but having it as its own program helps me keep everything consolidated and I love the feel of the program much better than the website.
The stamp tool is my best friend, as is the split view between 3D and 2D. Highly recommend it, unless you have a Mac computer (it's not compatible). If you can't run MCSkin3D for whatever reason, I'd begrudgingly recommend Novaskin, or PMCskin3D. Beyond that, you could use Minersneedcoolshoes (doesn't feature an alex version, from when I last checked it out), or an editing program like gimp or minecraft.net in extremely dire circumstances.
I really only use paint.net for mirroring portions of my skins, or hue shifting. It's really great for doing that, but I'll get into that later. For my ombra skins, I like using FireAlpaca -- even though it's a very clunky and time consuming process. I haven't found a way to 'hack' that one yet so bear with the really long process.
Here's the MCSkin3D toolbar. From left to right, it features: Save, Save All, Undo, Redo, View, Edit, Erase, Colour Picker, Dodge/Burn, Darken/Lighten, Fill Tool, Noise, and Stamp. Then you can change how you want to view your skin -- 3D, 2D, or a split between the two. The next icon is to revert your view/camera to the default, and the camera icon takes a picture you can copy paste. The next icons are to toggle off parts of the skin, head/torso/arms/legs, and the next are to toggle off the armour parts of the skin. The last is the model type you're working on -- you can switch between entities, blocks, players, etc. I only use Alex/Steve.
SAVE/SAVE ALL : Self explanatory. The former will save only the current skin you're working on, and the latter will save all the skins you have, period. It's a great one to hit if you know you might be losing power, or if you're closing up the app so you don't lose your progress.
UNDO/REDO : Again, self explanatory. You can undo each move you make (not pixel by pixel). So if you colour a whole leg in one go, it won't undo pixel by pixel, and will instead just undo the whole leg. Redo will put it back into place, unless you make another edit -- then it won't be able to reverse it.
VIEW : The default mode you're in when you open the app. You can twirl around the skin without worrying about changing or editing it using the left click button. I'm not usually in this mode ever, so I'm not familiar if it has other functions.
EDIT : This is where the fun begins. You can actually still move around the model, just use right click and drag instead of left click. Whatever colour is selected on the bottom left is what you'll be using, and you can even change the size of your brush to be bigger or smaller.
ERASE : Pretty self explanatory. Erase pixels. You'll have to make sure you're erasing on the right layer, though -- if you have the armour pulled up but are trying to erase on the base skin, it will erase on the armour portion and not the base layer.
COLOUR PICKER : Great for picking colours you already have somewhere on the current skin, or even on another skin. It'll preserve the colour you pick across skins in the same program.
DODGE/BURN AND DARKEN/LIGHTEN : I have like 0 experience with these tools. When I have messed around with them, I couldn't really get a grasp on what they .. do. If you know then you know, but I've had 0 use for them so I can't offer any valuable insight.
FILL TOOL/BUCKET : God send. Great for filling in large spaces. If you hold control, it'll only fill in the space on the part of the body you have selected -- instead of everything.
NOISE : This is gross. This is ugly. Do not use it to replace your shading, or I will find you. I promise.
STAMP TOOL : Another life saver. Hit control and then click whatever part of the skin you're wanting to copy, then it'll make that selection your 'stamp'. You can then click that wherever you want on the skin and it'll stick it there like a sticker. Great way to copy over an arm or leg that's supposed to be symmetrical without having to re-do the shading twice.
COLOUR, COLOUR, AND MORE COLOUR : Colour is super important in all art, and that translates to skinning. Picking colours can seem daunting, especially when there's so much choice. Picking colours that FIT together can be even harder, especially when you introduce shading into the mix.
The best way I've found to make good colour choices is not doing them myself. I am chronically bad at finding my initial colours -- and if possible, would love to just use the same ones over and over. Places like pinterest and palette sites really help get me out of my comfort zone, and help me find things I wouldn't have even thought of, period.
For your sake, here are some colour palettes I've made that I really enjoy using. Either because of their flexibility, or just how satisfying the colours are.
As you can probably see, I like using more muted/neutral colours. That's definitely personal preference, and you can absolutely use brighter/more out there colours depending on what your comfort level is!
In general when I'm deciding what colours to use, I'm looking at my reference, or at whatever design I have in mind. I usually use a darker brown/black for boots, a grey/brown for pants, an off white for blouses, and my 'main' piece of the skin -- either a dress or tunic -- will be the brighter, bolder colour, to attract attention and draw the eye there.
WHITE & BLACK, AND WHY THEY'RE EVIL : I hate shading white and black. I just do. If you've ever asked me to shade a black on black outfit, I've probably said no. The key to shading anything near black or near white is to ensure there's some colour still in there. A light blue or a light pink work well for white, and a dark blue or dark purple or dark red work best for black. Having NO colour at all when shading those two will bite you in the ass, and make the process miserable.
When shading, don't be afraid to deviate into the grey zone. Literally. It's okay to have your darker tones for white be closer to a grey, and your lighter tones for black be closer to a grey. There has to be DEPTH to the colours, and it'll translate better to have light and dark shades in your colour vs. just entirely dark colours. Here's two examples of what I mean by that.
You probably wouldn't see the left most colour as black, and the rightmost colour as white. But having a range of SHADES for each colour is important to bringing it to life, so don't be afraid of having a big difference between each shade of your colour.
Both this black and this white have a bit of red in them. They're not PURE black and white, and shading is much easier for them -- as well as tying them into the rest of the colours of your palette/skin. If you're shading with mostly warm colours, add some red into your blacks/whites. If you're shading with cool colours, add some blue/purple into your blacks/whites. I promise it'll make all the difference when you look at the final cohesive look.
MAKING SHADING PALETTES : There's a difference between colour palettes, and shading palettes. Colour palettes are the general colours -- which ones you're going to be using in your skin. Shading palettes on the other hand, are the different shades of the same colour. The dark to light gradient that'll bring your skin to life.
With every colour, I make a shading palette. Every single one. It'll help you keep your shades consistent, and help in the event you're wanting to hue shift a skin later on. Just helps me keep myself organized.
Examples of completed shading palettes.
→ Step 1; select your colour.
→ Step 2; make a shade lighter than your colour.
→ Step 3; make a shade lighter than your light shade.
→ Step 4; make a shade darker than your original colour.
→ Step 5; repeat the process until your bar is full.
I usually do about 8 different shades for each colour. Light on one side, dark on the other, so it's a gradient. When making the palettes, I find it helpful to put them on the skin itself -- in the unused space that won't ever show up on the skin, but is still part of the file. It's easy to see those parts when you're looking at the skin in 2D mode.
On the bottom left of your MCskin3D program, there's a colour wheel, triangle, and some slider bars. There's three different tabs - RGBA, HSVA, and Swatches. I usually only use the HSVA tab when I'm making my own shades, and the RGBA tab when I'm importing the initial colour. I don't make much use of the swatches tab just because I like making more work for myself, I guess.
When making shades, it really depends on where your initial colour is. If it's already a pretty bright colour and you're wanting it to stay light, the difference between shades is minimal. When you're working with a bolder colour, like a rich purple or red, there's usually more difference between the shades because there's space to play with the values.
For our example green, I used the HSVA tab and adjusted the numbers accordingly.
Making the first lighter shade:
→ +1 H (H stands for hue. It's where the colour falls on the colour wheel)
→ -4 S (S stands for saturation. How much of the colour is present, or if it's dulled down)
→ +4 V (V stands for value. How light/dark the shade is)
Making the first darker shade:
→ -1 H (When going darker, I usually go down. Not sure why, it's just what I usually do)
→ +2 S (When going darker, I add a bit more colour to my colour. Helps preserve the look of the shade.
→ -4 V (When going darker, you're obviously going to want to lower the value. Lower value means darker colour, and vice versa.)
There's no set formula for making colours. It's whatever feels right depending on the colour you chose, and how much of a difference you want between shades. I've seen some skinners have a really big difference between their shades with make the skin much more intense, and some skinners have very little difference between their shades, which makes the colours blend together. All about finding a level that you're comfortable with -- I usually try to find a happy medium.
SHADING : This one is a big one, and the question I get asked the most. The best tactic to shading, in my mind, is literally just practice. Your first skins won't turn out the best skins you've ever seen. You might be disappointed, and that's okay -- skinning is a journey.
When I shade, the most important step (in my mind) is figuring out where the shadows vs. light spots are. That's what gives you the most realistic shading, and makes the skin look like an actual person.
Using the colours we just made, here are the shadow areas vs. light areas. In my mind, shadows are usually where some parts of the body meet the others. Inside of legs, where your arm meets your torso, chin to chest, and the shape of your chest. The alex represents a more 'feminine' shadow, and the steve represents a more 'masculine' shadow. These will change depending on what shapes you're wanting to convey with each skin, and will change depending on what clothing you have on the skin, etc etc.
Figuring out where your darker tones and where your lighter tones are going is key to having the rest of your skin look cohesive. No random light spots where it realistically should be dark, and vice versa. This is by no means the DEFINITE placement of shadows, and you should definitely be experimenting for yourself!
From there, shading becomes a piece of cake. Fill in darker colours, then midtones, then light tones, and you've got yourself a shaded piece. I'd recommend toying with how you place the pixels -- each pixel doesn't HAVE to be touching a different shade, and you can actually have shades overlap.
SHAPING & PLACEMENT : Shaping is another important part to any skin. Making sure your skin looks realistically proportionate can definitely be difficult, especially with the limited amount of pixels, but there are definitely ways to make it work.
First thing is to decide whether you're wanting to make a skin with more masculine features, or feminine features. There are definitely ways to make androgynous skins, but it helps if you're gunning for one of the first two -- placements will be different.
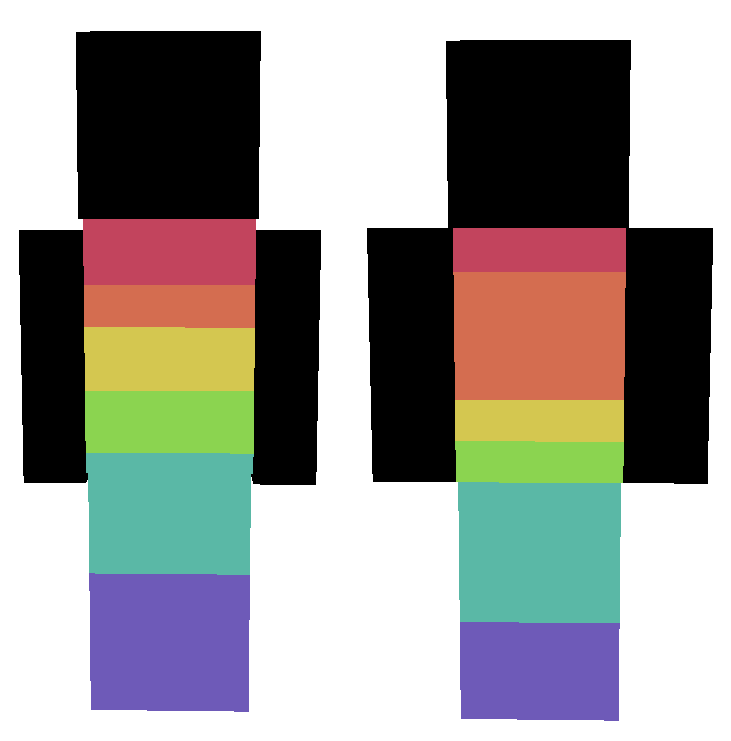
As you can see, depending on feminine vs. masculine, the areas for each thing varies a bit. Longer torso vs. longer legs, that sort of thing. Here's a break down -- but keep in mind this is just a general idea of where things can go, vs. a hard RULE to follow. Do what makes sense to you.
→ Red: Neck/shoulder/collarbone area. Where the neckline of a shirt would usually be.
→ Orange: Chest area. Where the boobies are.
→ Yellow: Waistline. Where a belt would be to divide the torso from the legs.
→ Green: Hips. Where a corset would end and a skirt/pants would begin, or just the top of the pants/skirt.
→ Blue: Legs. This can be longer down if you don't want any shoes showing, like with a skirt.
→ Purple: Boots. Can be longer or shorter depending on the type of shoes/boots you're wanting.
REFERENCES : I swear by references. All day every day. There is absolutely no shame in finding something you like on pinterest, then making your own version of it. Copying other peoples' skins though -- not the best. I'd recommend asking permission if you wanted to take aspects of someone's skin when making your own, unless it's just generic shapes.
The only problem with minecraft skins is there isn't always a lot to work with, space wise. You are very limited in how many pixels are on a skin. Overly detailed references will never be replicable on a skin -- unless you're doing an HD skin, which is its own beast (I don't touch those anymore).
When making a skin from a reference, it's important to identify which features are 'key' -- which things you'll translate over others. Maybe it's the shape of the sleeves, the fit of the jacket, the really cool thigh high boots. From there you can fill in the rest of the skin -- leaving out details in favour of encompassing the vibe of the original design.
I'm not going to go through a reference to illustrate what I mean, just because I want you to figure it out for yourself -- but I'm usually reachable on discord if you're having trouble with something.
Thanks for making it through! I'll probably be posting some smaller tutorials in the comments below when I have the time/energy, but hopefully at least one thing in here was helpful! You're more than welcome to reach out in regards to ANY skinning questions you might have, but I can't promise an immediate (or helpful) response, especially if you ask me the same question over and over.
MILF SHAPE : Sorry about the name. I was asked specifically how to do this trick, so I thought I should include it! Ever since I started doing this, making feminine skins WITHOUT this trick feels so .. weird. Like their torsos are wider than they should be, or something.
The 'milf' shape gives the illusion of a slimmer waist and wider hips.
The KEY to the milf shape is putting some of the sleeves on the torso area. That's the necessity for the milf shape -- everything else (sleeve length/corset/belt/skirt/pants etc) is completely changeable. Some hat layer from the sleeves needs to be on the hat layer -- or if you're feeling particularly bold, you can even do no sleeves at all, like this.
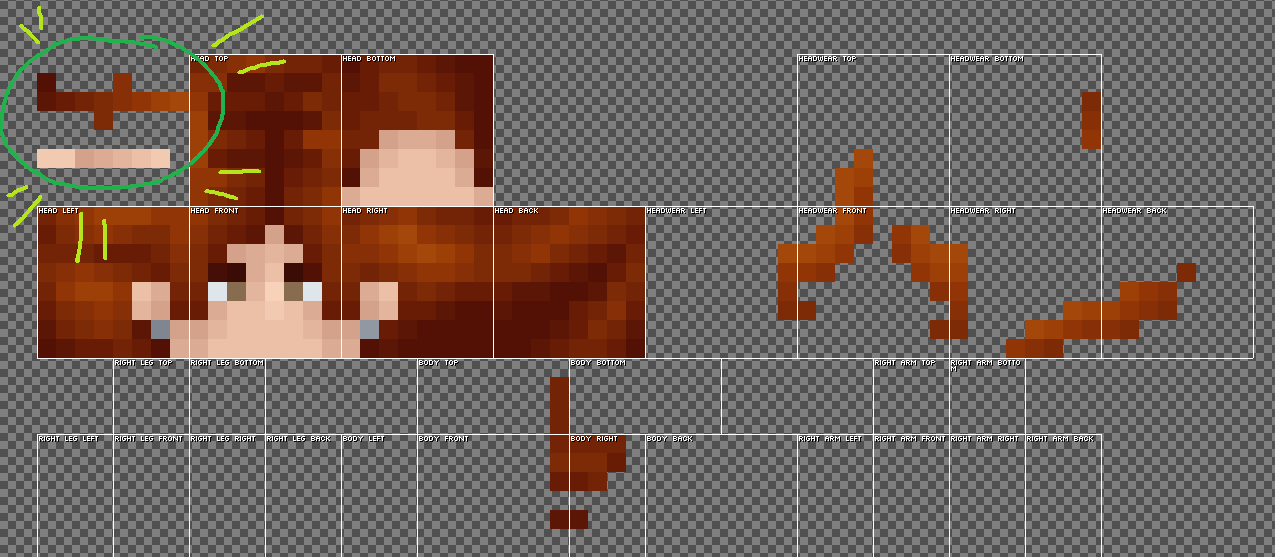
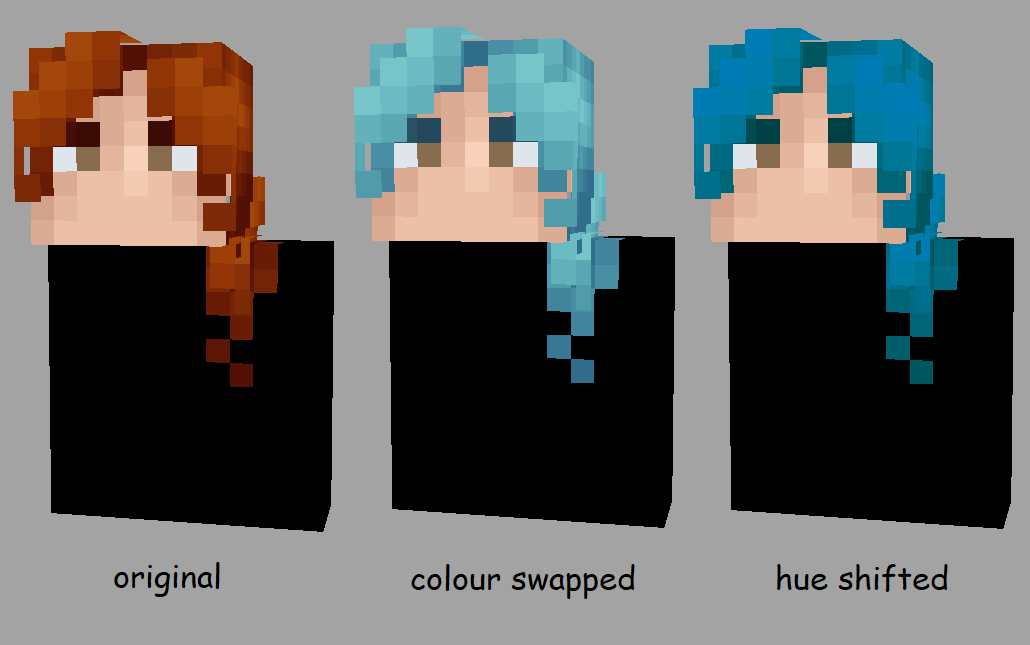
After posting a FTU skinbase some time back, I thought it'd be a good idea to make a little tutorial on how I swap colours on skins.
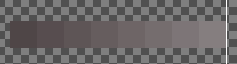
As you can see, the original is in grey -- not the optimal skin shade, unless you're playing a Kathar!
All of my skins feature palettes I used to shade the skin, which can be really handy if you're needing to swap colours around. You can find the palette by opening the skin in paint.net, or the 2D mode in MCSkin3D if you use that.
The first step to swapping around the existing palette we've got on the greyscale skinbase is to make sure you've got a palette for YOUR skin! If it was made by me, chances are there's one on the top left. If not, it's pretty easy to make one -- all you have to do is colour pick the existing shades from your character's skin, and/or make some new shades to match the amount on the greyscale skin.
The greyscale skin has 8 different shades, so you'll need 8 shades total on your palette as well.
Here's the palette from the skin above, with some added shades to match the number on the greyscale skin.
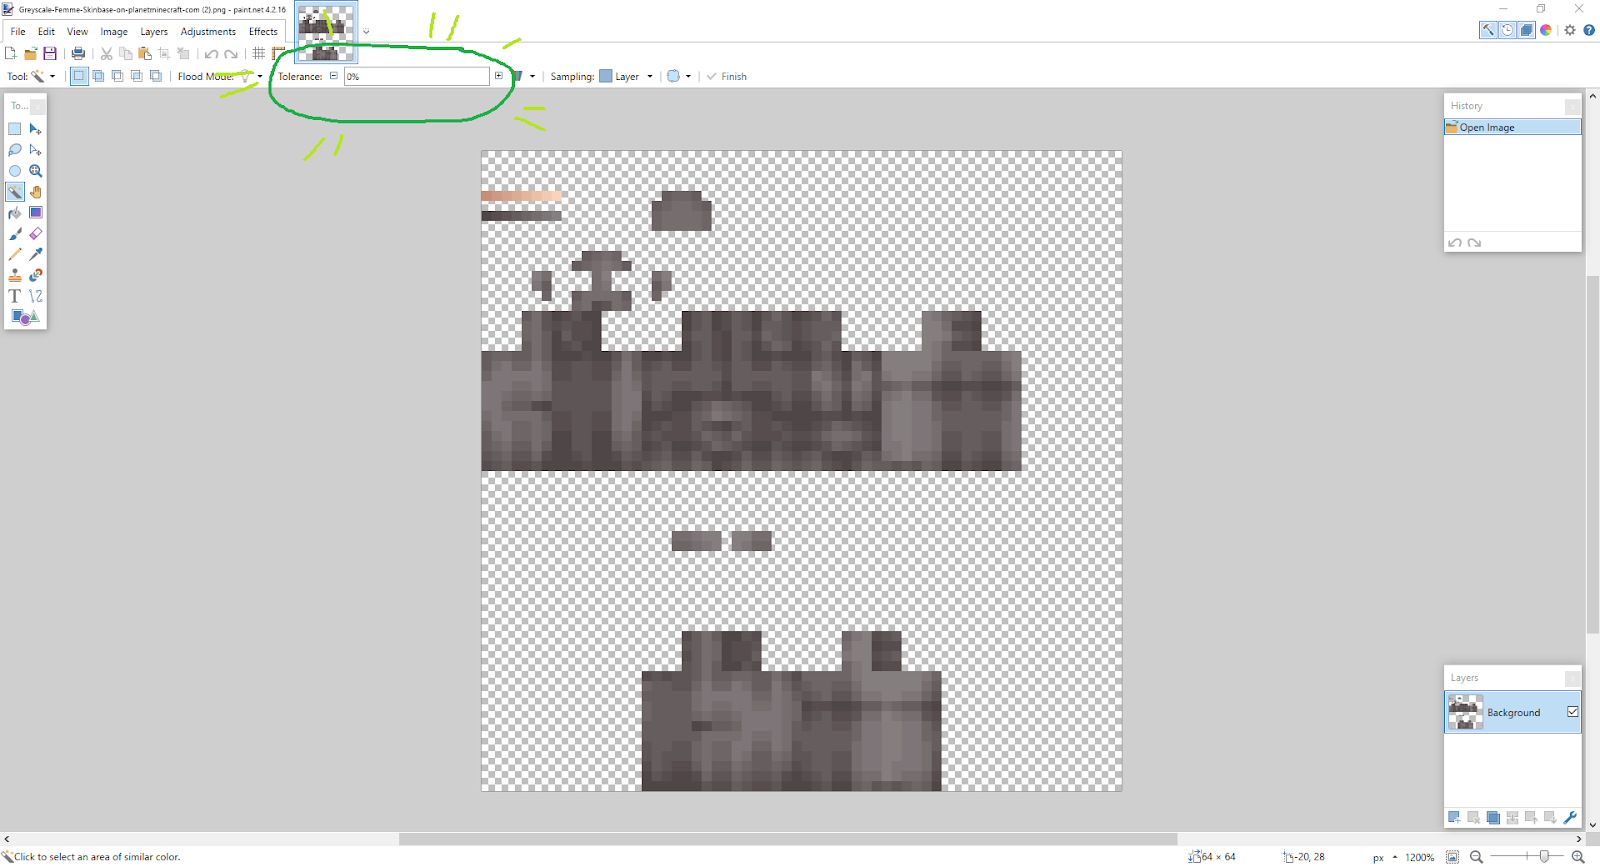
With that step done, we need to bring the file itself into an image editing program. For this tutorial, I'll be using paint.net -- other applications work, but this is the one I usually use and is most familiar to me.
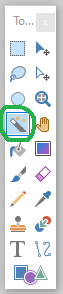
Now, click the magic wand tool on the toolbar at the left.
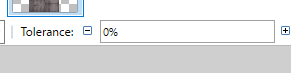
Then set your "tolerance" to 0 up at the top by dragging it all the way to the left. This will make sure each pixel you're selecting will ONLY select that colour, and not ones that are kind of close to it shadewise.
Next, hold down shift and click on the first grey shade you're wanting to change. I usually go left to right, or right to left. When you hold 'shift' while clicking, it'll select every instance of that shade.
Now that I have all of the lightest shade selected, I'm going to select my colour picker tool from the toolbar on the left.
With this tool, you'll want to pick the colour that corresponds to whichever shade you selected on the greyscale palette. In this case, I'm going to select the palest shade of skin tone.
You'll also want to set the tolerance at the top to 0 if it isn't already.
Now, with the paint bucket tool, you'll also want to hold down 'shift' and click inside one of the areas you have selected. Holding shift will fill all of the selected areas with the colour, so all of that shade will now be filled in!
Hit CONTROL + D to deselect everything you have selected.
Now you've got the first shade filled in! You just repeat this process with each shade, doing it one at a time until the whole thing is swapped to the colours you'd like.
Ta-da! Now just save the file, and you'll be all set!
I usually use colour swapping instead of hue-shifting for my skins if I'm looking to do a specific set of colours for my skins. You can do this with pretty much anything skinwise, and can make your own palettes of existing colours from a skin you have if you want to swap it around too!
Here's an example of the same head, one with colour swapping and one with hue shifting -- hue shifting isn't always terrible, but I find it can really wash out some of the differences between shades, and might not always match the colour I'm going for.
I hope that helps you on your skinning journey, and increases the usability of your skins!
This site uses cookies to help personalise content, tailor your experience and to keep you logged in if you register.
By continuing to use this site, you are consenting to our use of cookies.


")