- Joined
- Sep 4, 2016
- Messages
- 235
- Reaction score
- 1,170
- Points
- 233
hi.

-
I decided to make a step-by-step walkthrough of my skinning process. As
a whole, I just want to help people make quality skins in half the time. Not that it'll
stop y'all pinging me for thotty outfits.
Let's begin!
•·················•·················•
First off, I don't care what anyone says - the MCSkin3D desktop program is the most optimized client you can use for skinning. Or maybe I'm outdated, I don't know.
Get it here.
-
Then read this guide by Goldifish if you need it.
•·················•·················•

References!
-
I decided to make a step-by-step walkthrough of my skinning process. As
a whole, I just want to help people make quality skins in half the time. Not that it'll
stop y'all pinging me for thotty outfits.
Let's begin!
•·················•·················•
First off, I don't care what anyone says - the MCSkin3D desktop program is the most optimized client you can use for skinning. Or maybe I'm outdated, I don't know.
Get it here.
-
Then read this guide by Goldifish if you need it.
•·················•·················•
References!
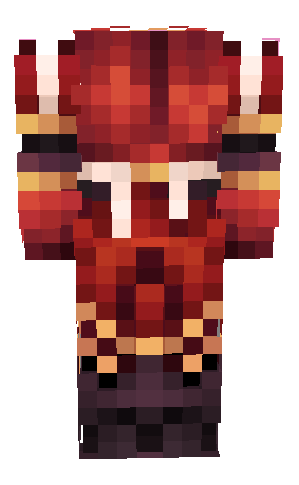
The best references for skins have very clearly defined "sections" of an outfit for you to plot onto your base. A simple color scheme also goes a long way when you're learning how to skin, but as you get more advanced you'll find that you memorize certain patterns that let you skin almost anything, ref or not. It's all about learning what you can and can't do on the skin, and how to work with each area of the body.
 __________________________________________
When using a reference, I like to zero in on the parts of the image that stands out the most and can be easily translated onto a skin. For the sake of this tutorial, I've circled those areas on Farquuad's outfit. They have to be put onto the skin for it to keep the same look.
__________________________________________

Palettes!
It might help to create a basic palette. Personally, it's easier to just pull from the color wheel, which is why it's important for you to get familiar with it. If you're just starting out, then taking the time to set out the shades you're going to use can be very helpful.

__________________________________________

Mapping the first layer!
Mapping is basically just creating the outline for your skin. This is the entire reason we circled those sections
on the reference earlier.
•·················•·················•
All we have to do is get the general shapes of our reference down. Note that the same things I circled earlier were added to the skin, and even though we have two references, nothing gets lost in the details or overcrowded.
•·················•·················•
Cont'!
When it comes to your first layer base, the BIGGEST thing we have to keep in mind is that shading should be minimal. Most skins can be finished in a 3-hour session, maximum. It depends on your level of practice, especially when it comes to armor and beast races. This outfit took me from approximately 12:38 AM to 1:50 AM, so, one hour and twelve minutes to complete. Please don't question my life choices.
•·················•·················•
Once you have your base colors down, add shadow. It's fine to use the darken/light tool here, but keep things simple.
__________________________________________

Now we're going to start our second layer mapping using hue-shifted tones. I'm not going to go in-depth on what hue shifting is right now, but scroll further down and there's a mini section + a resource to help you out with that! For our pallette:
Red »» orange
Gold »» yellow
Black »» some sort of desaturated plum color, man.

P.S. - Shading black and white can be hard but there are actually some neat tricks to that. Maybe I'll make another tutorial?
•·················•·················•
Cont'!

When using a reference, I like to zero in on the parts of the image that stands out the most and can be easily translated onto a skin. For the sake of this tutorial, I've circled those areas on Farquuad's outfit. They have to be put onto the skin for it to keep the same look.

Palettes!
It might help to create a basic palette. Personally, it's easier to just pull from the color wheel, which is why it's important for you to get familiar with it. If you're just starting out, then taking the time to set out the shades you're going to use can be very helpful.
__________________________________________
Mapping the first layer!
Mapping is basically just creating the outline for your skin. This is the entire reason we circled those sections
on the reference earlier.
•·················•·················•

All we have to do is get the general shapes of our reference down. Note that the same things I circled earlier were added to the skin, and even though we have two references, nothing gets lost in the details or overcrowded.
•·················•·················•
Cont'!
When it comes to your first layer base, the BIGGEST thing we have to keep in mind is that shading should be minimal. Most skins can be finished in a 3-hour session, maximum. It depends on your level of practice, especially when it comes to armor and beast races. This outfit took me from approximately 12:38 AM to 1:50 AM, so, one hour and twelve minutes to complete. Please don't question my life choices.
•·················•·················•

Once you have your base colors down, add shadow. It's fine to use the darken/light tool here, but keep things simple.
__________________________________________
Now we're going to start our second layer mapping using hue-shifted tones. I'm not going to go in-depth on what hue shifting is right now, but scroll further down and there's a mini section + a resource to help you out with that! For our pallette:
Red »» orange
Gold »» yellow
Black »» some sort of desaturated plum color, man.
P.S. - Shading black and white can be hard but there are actually some neat tricks to that. Maybe I'll make another tutorial?
•·················•·················•
Cont'!

I ended up with something like this. I added some white and some belt detailing. This is a good place to start playing with the reference and add some design flair. It's okay to not 100% stick to the original image.
▃▃▃▃▃▃▃▃▃▃▃▃▃▃▃▃▃▃▃

__________________________________________
If your second layer map looks something like this, you're probably overcrowding your skin. Doing too much on the second layer makes things look chunky, and you lose a lot of your shape. Remember that you're supposed to be adding depth to your first layer, not completely drawing over it. You use your first later to create shadows, and the second to highlight them.
You're a pissbaby.
If your second layer base looks like this, you're probably shying away from doing anything fun with your shading or not planning to hue shift. It's not BAD, but nothing really stands out. It'll look even worse if you use dodge/burn or darken/lighten tools, and don't bother to manually change hues once in a while. Don't be scared to learn a smidge of color theory.
Your skins will look better for it. Here's a comprehensive tutorial on palettes and hue shifting. I remember using this at some point in 2014 and it's STILL GOOD:
I see this a lot with people who are in that Frankenstein stage of skinning, mainly. Mapping skins get confusing when you don't start your skin from scratch, but this is an exaggerated example. NEVER use colors that are darker than your first layer base on the hat layer. You're just layering shadows on top of shadows and it doesn't make any sense, try restarting by pulling colors that are generally lighter than your first base and it'll look great.
__________________________________________
Having trouble with something else? Respond to this thread and I'll be sure to reply when I can!
__________________________________________

Shading!
Shading has more to do with real-life anatomy/light sources than you'd probably expect. Notice how the outside of the arms, tops of the shoulders, top of the torso, and the center of the skirts and boots are highlighted the most. In real life, this is where your light source would hit the outfit. If you keep this in mind when shading, your skins are going to read more realistically to others + you have the benefit of beautiful highlights. @WaterDruppel ty demi for your help earlier :>
__________________________________________

REEEEEEEEEEEEEEEEEEEEEEEEEEEEEEEEEEEEEEEE
Honestly, since we've got the front of our skin done the rest is pretty simple. The main thing you need to know is how to use the clone/stamp tool in MCSkin3D and when to apply it.
▃▃▃▃▃▃▃▃▃▃▃▃▃▃▃▃▃▃▃

__________________________________________
▃▃▃▃▃▃▃▃▃▃▃▃▃▃▃▃▃▃▃
__________________________________________

If your second layer map looks something like this, you're probably overcrowding your skin. Doing too much on the second layer makes things look chunky, and you lose a lot of your shape. Remember that you're supposed to be adding depth to your first layer, not completely drawing over it. You use your first later to create shadows, and the second to highlight them.

If your second layer base looks like this, you're probably shying away from doing anything fun with your shading or not planning to hue shift. It's not BAD, but nothing really stands out. It'll look even worse if you use dodge/burn or darken/lighten tools, and don't bother to manually change hues once in a while. Don't be scared to learn a smidge of color theory.
Your skins will look better for it. Here's a comprehensive tutorial on palettes and hue shifting. I remember using this at some point in 2014 and it's STILL GOOD:

I see this a lot with people who are in that Frankenstein stage of skinning, mainly. Mapping skins get confusing when you don't start your skin from scratch, but this is an exaggerated example. NEVER use colors that are darker than your first layer base on the hat layer. You're just layering shadows on top of shadows and it doesn't make any sense, try restarting by pulling colors that are generally lighter than your first base and it'll look great.
__________________________________________
Having trouble with something else? Respond to this thread and I'll be sure to reply when I can!
__________________________________________
Shading!


REEEEEEEEEEEEEEEEEEEEEEEEEEEEEEEEEEEEEEEE
Honestly, since we've got the front of our skin done the rest is pretty simple. The main thing you need to know is how to use the clone/stamp tool in MCSkin3D and when to apply it.
▃▃▃▃▃▃▃▃▃▃▃▃▃▃▃▃▃▃▃
__________________________________________
- Making the arms symmetrical.
- Making the legs symmetrical.
- Filling in the inner legs, arms, and torso.
- Filling in the bottom of the legs.


- Skinning the bottoms and tops of the arms (it doesn't take long and I've always found clone/stamp for small areas like this can be more of a hassle.)
- Skinning the top of the torso.
- Skinning the sides of the arms symmetrically (so you can clone stamp one arm onto the other arm.)
- Skinning the back and front of the skin.
__________________________________________

Skinning the back!
Notice how the arms and legs are identical to how they are on the front. You can't do this for every outfit, but in general, the back of the torso should be done by hand.
In general, mapping the back is just as important as doing it on the front. Take the same steps as above. Don't let a big space intimidate you. Keep the shading on the first layer light and then continue the detailing that's on the front of the skin. If you have a belt or sash, for example, you'll want those to be present on the back. The back of the skin doesn't have to be as elaborate as the front, but you should take your time on it.

A lot of people ignore this tool because they can't figure it out the first time.
Skinning the back!


Notice how the arms and legs are identical to how they are on the front. You can't do this for every outfit, but in general, the back of the torso should be done by hand.
In general, mapping the back is just as important as doing it on the front. Take the same steps as above. Don't let a big space intimidate you. Keep the shading on the first layer light and then continue the detailing that's on the front of the skin. If you have a belt or sash, for example, you'll want those to be present on the back. The back of the skin doesn't have to be as elaborate as the front, but you should take your time on it.
A lot of people ignore this tool because they can't figure it out the first time.
- Select your brush. In my experience, the best brushes are sizes 3,4, and 8 for your arms (Alex and Steve,) legs, and head.
- Find what you want to clone.
- Hold down shift and hover over what you're going to clone. The clone tool will become white when it saved the area you're cloning.
- Paste it over where you want to stamp by hovering with your mouse and right-clicking.


Profit???

My bad.
The only thing here I can't explain is .. design beyond the ref. You've got to gain an eye for that through practice alone. My piece of advice there is to experiment with what patterns look good for certain parts of the skin, boots, gloves, etc. Keep highlights in mind (where is the center of this piece?) When you DO try to create those patterns!
•·················•·················•
Thanks for taking the time to check out my tutorial in the first place! The replies below generally can be used for memeing and help requests. Join this super sexy Discord where you can get feedback, request/take on commissions, and improve your skinning here!
Last edited:


